3.26.2008

More fun . . . .


Here are a few more. I've been having a lot of fun lately! I am so excited for my big workshop too! I've been making flyers as well to send to neighbors and friends.

1. Thanks is using Very vanilla and Chocolate Chip card stock, and Chocolate Chip and Soft Sky ink pads. The stamp set is Baroque Motifs. I stamped the imaged twice on the card with SS. Then once in the middle with CC. I rubbed the edges w/ CC. The oval was cut out with Coluzzles. The VV oval I stamped the image w/ the SS, then the words with CC. The brads are the brass color. I placed those with the 2 ovals mounted together, then mounted on the card. Then to finish it a little ribbon.

2. Enjoy every moment is using Certainly Celery and Lavender Lace inks and card stock, and the Enjoy every moment stamp set, and Hot to dot wheel (retired). I also used some glittery embossing powder for the dots and for the center of the little flower in the 'o'

3. This is using Pixie Pink, Pumpkin Pie carstock and inks. The buttons and brads are So Saffron. The background is with Sprinkles stamp set, the words are from Much Appreciated, and the flower is from Be Happy.
More play


I had a chance to play a little more last night, and these are the three I made.

1. enjoy is made with Very Vanilla and Pumpkin Pie card stock, Pixie Pink and Pumkin Pie ink. This has very basic assembly. I stamped enjoy with PPink onto VV card stock. The button is PPie with PPink ribbon tied on top. The wheel is Boho Friend in PPink. I stamped dotted circles over the bordered flowers in PPie to add color. Stamp set it Enjoy every Moment.
2. Thank you is using Very vanilla cardstock and Certainly Celery, Lavender Lace ink pads. I made the background using the stamp from the Sprinkles set and repeated it all over, it is stamped with Chocolate Chip. I then watercolored the flowers with the LL and CC (if you don't know how to do this, it is a favorite technique of mine, let me know, and I can show you!). The Thank You is from Much Appreciated stamp set.
3.Kind is using Regal Rose and Chocolate Chip card stock. All the ink was with Chocolate Chip. This was used with the Baroque Motifs stamp set (one of my FAV's!) I stamped the large image twice. Then with my Stampin' Write marker in CC I added dots around the thinnest lines. For the kind embellishment, I used the marker on the dots that surrounds a flower on another stamp int he Baroque motifs and stamped on another piece of RR paper. Then on a separate piece stamped kind, then punched that out with 1" punch then rubbed the edges with CC. And place with a pop up glue dot in the center of the dotted flowed. Then that is cut out along the edges.Then I cut the CC card stock matched with my cut flower, but then turned it and then mounted to the CC card stock. Then is added with another pop up glue dot.

3.25.2008

It's Christmas!


Today was like Christmas for me! Is it early or a 2nd? Either way it was Christmas!!! I received my new demonstrator kit in the mail, including 6 stamp sets, 6 new colors, and so much more!
It took me about an hour to assemble all of the stamps sets (and then once done it was 12 am!), but the real fun is just beginning! Once I got them all together, I couldn't decide which to use first. Because of the hour, I only made one card, so here it is! It is using Enjoy Every Moment set, very vanilla and pumpkin pie card stock. The ink colors are Pumpkin Pie, Soft Sky and So Saffron. This was a quick make and pretty simple. I stamped the large flower in PP and SSky. I cut out the PP and attached to the SSky image with a pop-up glue dot. Then the center is stamped with SSaf and used the 1/2 circle punch, then mounted to the image. I pierced the PP card stock before mounting to the card. The rest is self explanatory. It was fun, and I love it (the new set) already! I can't wait to play some more!

3.20.2008

For Easter

Here are some ideas for Easter. I don't have any 'Easter' sets (yet...wink, wink), so these are using flowers (what could be more Eastery than tulips and daffodils? So here are some ideas to make this weekend a little more fun!


If you are giving something little, or even something big, put a tag on the egg! It makes it so cute, and maybe a tag on one, but a ribbon on the rest, it adds a little chic elegance to it. This is using Stampin' Up!'s Watercolor Mini's, the colors are Lavender Lace, Orchid Opulence, and Old Olive for the stem.
Tip: When doing two-step stamping, whether with the same stamp, or in a set, do the lighter color first.

Again, for something small, this is a painted gift box (available at craft stores), then I added a border. It is using my two-step stamping set, Watercolor Minis (they are retired, but there are many two-step sets in our current catalog). This is again using Lavender Lace, Orchid Opulence, Old Olive, and for the yellows, they are Summer Sun and Apricot Appeal.


Here is a fun thing to add into Easter baskets, or make an arrangement to give as a gift to your visiting teachers, a friend, or whatever. The flower is from It Looks Like Spring (sorry, also retired), the color is Pink Passion, the center is Summer Sun. I stamped the image twice, cut it out, and mounted the center of one on top the other for a 3D and fuller look. Then I put a glue dot on the back to mount to the candy stick. Embellish with a ribbon ( I used green to substitute leaves).


And finally the card! This set is Best Blossoms (again, retired). I stamped the different flowers on So Saffron card stock with Orchid Opulence. Then cut each out and arranged in a bouquet. They are all fully or partially mounted. The leaves are also stamed on So Saffron, with Old Olive, then cut and mounted. The stems are from the set as well, they are not as long, so I stamped them again to make then a little bit longer. I wrote Happy Easter with the Stampin' Write Marker in Orchid Opulence, then mounted on the Old Olive, then mounted on the card.

3.17.2008

Free Wheelin' Promo

From March 18 until April 30, when you purchase a selected stamp set, you will get the coordinating Stampin' Around Wheel free!
Sets are:
Wonderful You- $33.95 on page 91
Life's a Breeze- $29.95 on page 80
Pun Fun- 30.95 on page 66
Year after Year- $30.95 on page 60
Stitched Exotics- $33.95 on page 83
Enjoy Every Moment-$29.95 on page 51

For more details, email or call me!

Hostess a Workshop! Check out this Promo!

From March 18th through April 30, you can earn EXTRA hostess awards! If your workshop totals over 350$ in sales you can earn an extra 25$ worth of product on top of the normal rewards! This is an amazing deal! Email or call me today to book a workshop! I have a flexible schedule and can work with your schedule!

More from Friendship Blooms


Here are two more cards to try from the "Friendship Blooms" set.

The first uses Basic Black and Taken with Teal cardstock. The image is stamped, then I water colored the image with a watered down Taken with Teal, and watered down Summer Sun for the center. Then the words are from the set "It's Your Birthday." The words are also stamped in the TwT. I then rubbed the edges of the TT paper and the words on my BB ink pad to give it a sharp, clean look.

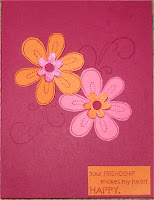
The second uses Purely Pomegranate, Pixie pink, and Only Orange card stock and ink. With the PPom. I stamped the flower on both the PPink and OO card stock twice. I cut out the center on one of each color to place on the center of the opposite. The scrolling swirl stamp is in the back with the PPom stamp, placed in opposite directions of each other and the Flowers placed over where the two meet. Then the phrase comes with the Friendship Blooms set, is stamped on the OO card stock.

Happy Stamping!

3.15.2008

My newest Stamp set


Thanks to the Sale-a-Bration, one of my newest stamp sets is Friendship Blooms. Here are a few cards I have made using it.

The first one is using Friendship Blooms and the circles in the back is from Seeing Spots. The papers are Purely Pomegranate, Old olive, and Whisper White. I stamped the flower onto the purely pomegranate paper then embossed it in white. Then the flower is popped up using a pop up glue dot.

The second one is using Purely Pomegranate, Old Olive, and So Saffron. Then notice the tear? I used the Tearing Edge and tore the SS card stock, and that is mounted on the PP. Then I used the coordinated ink colors ands card stock behind the stamped image on the SS to make the colors pop. Only the center of the flower is mounted to the PP cardstock, then I bent the petals outward just a little bit. The PP is then on the card with a pop up glue dot.

3.07.2008

Under Construction . . . .

We are under construction! I am soon becoming a demonstrator!! Then I will be posting ideas for the new stamper, the average, and the advanced! Along with a monthly post of updates and news from Stampin' Up! I am so excited! If you want to know more, just call or email me!